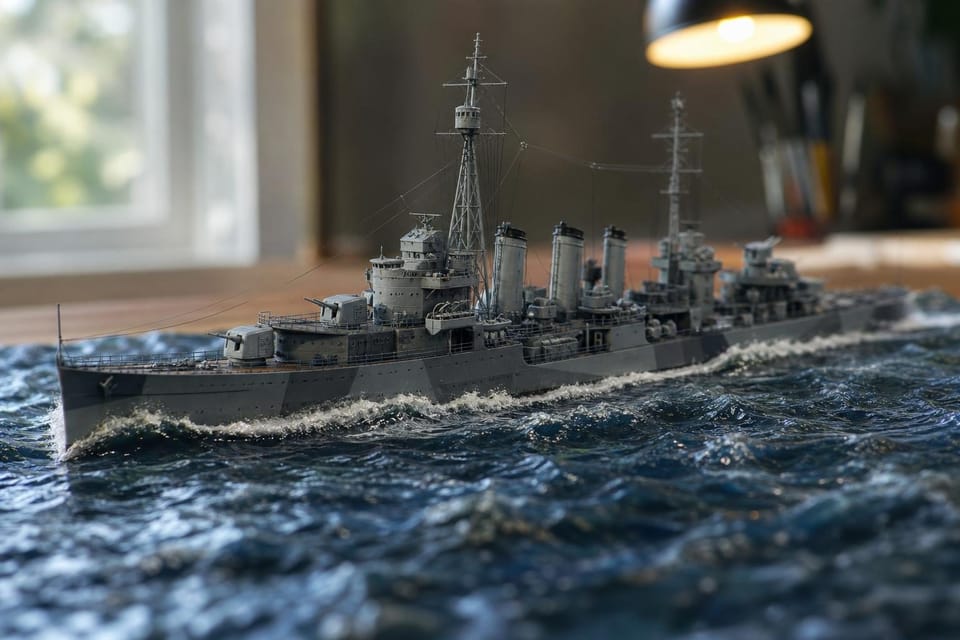
A 1/350 battleship is longer than most bookshelves, and a 1/700 one fits in a shoebox. That one decision, made at the shop counter, shapes the whole build. Ships are the slowest subject in modelling and also the most quietly rewarding: small parts, long lines, and a finished model that looks like a naval architect’s drawing come to life.
Scale and hull type
Two scales dominate. At 1/700 a large warship is a few hundred millimetres long, the detail is tiny, and whole fleets are collected. At 1/350 the same ship has room for individual fittings, and a Bismarck at that size is about 717 mm long. Tamiya’s Water Line series at 1/700 is the long-established starting point, and its precise fit explains why.
The other decision is the hull. A waterline model stops at the waterline and sits on a sea base, so you skip the part below the surface and the painting of the red anti-fouling that only a drydock would show. A full-hull model comes with a stand and shows the underwater lines. Many modellers prefer waterline for the sea base and the lower cost of materials; full hull makes sense for sailing ships and for modellers who want the ship on a shelf in a cradle. The scales guide explains how to check the length against your display space.
Building the hull and decks
Hull halves rarely join without a gap. Fill the join with thin layers of filler, sand it flush, and rescribe any lost plank lines or panel lines on the deck with a scriber. Wooden decks on many warships are best painted in a pale tan or a dark brown-grey, then washed in a darker shade; some kits supply wood-grain decals or etched steel decks.
Build the superstructure as separate blocks, paint them, and fix them last. A bridge, funnels and gun turrets are easier to handle off the hull. Fit the turrets so they can still rotate, with a drop of cement only on the base ring, since their angle changes how the ship looks.
Hull colours on warships are often two-tone: a darker grey on the hull and a lighter one on the superstructure, with a different colour for the decks. Look up the scheme for the exact ship and period before you spray. The airbrushing guide covers the spray work, and masking the boot-topping line with tape gives a clean boundary between hull and waterline colour.
Photo-etch railings and fine detail
Plastic railings are always too thick. They look like picket fences at 1/350 and like solid walls at 1/700. Photo-etch brass sets from makers such as Eduard and Aber replace them with scale-correct, nearly transparent frames, and also supply ladders, radar antennas and watertight doors.
Cutting etch from its fret takes a sharp blade and a flat cutting mat. Hold each part with tweezers, and fold it with a straight-edge, since a bend made by hand tends to wander. Superglue is the usual adhesive, applied with the tip of a cocktail stick. Prime and paint railings before fitting, because brushing paint into an assembled railing fills the gaps.
Plan for a lot of work. A full set can take longer than the hull. Fit the most visible railings, usually along the main deck and the bridge, and skip the least visible, because a model with half its etch done properly looks better than one with all of it done badly.
Weathering a ship
Warships are weathered more gently than tanks. Salt and rain streak the hull below the deck edge, funnels blacken at the top with exhaust soot, and the deck wears pale where crews walk. A thin wash of dark grey in the recesses and a few streaks of diluted brown from scuppers and anchor hawsepipes are enough at 1/700; at 1/350 there is room for more rust and for chipped paint at the edges of hatches. The weathering guide covers washes and filters in general.
Restraint matters because small ships can lose their detail under heavy treatment. Test on the underside of a spare turret first, and remember that most real warships in service were kept clean by their crews. Decals for pennant numbers and aircraft markings go on over gloss, as on any other subject.
Rigging and masts
Many ships carry thin lines between masts, funnels and yards, which in the nineteenth and early twentieth centuries were a significant visual element. Without them the model looks bare.
Elastic thread such as EZ Line is the easiest material: it stays taut when tugged to length and glued. Stretched sprue gives a more rigid line and a plausible sag-free look for stays, and fine wire holds shape best. Drill holes in the mast or attach to eyelets, then fix with superglue and trim. Use photographs of the real vessel, as the rigging varied from refit to refit and a diagram from a different year will be wrong.
Sea bases
A ship without water looks as if it has been left on a table. A sea base gives it a place, and the best ones are simple. Cut a base from MDF or foam board, paint it in layers of dark blue-green, lightening toward the edges, and fix the hull with a few screws from below.
Water texture comes from acrylic gel or a purpose-made water-effects product, applied in thin coats. Shape a bow wave and a wake with a spatula or a stiff brush while the gel is wet; add a few white-tinted peaks where the bow cuts through. A ship at speed has a longer wake than one at anchor. Leave each layer to cure fully, then seal with gloss varnish.
Keep the wake in proportion with the ship’s size: a large wave makes a ship look like a toy. The armour guide has a similar section on bases and dioramas for vehicles, and a club table is a good place to see which approach looks best in real life.
The subjects hub lists the other genres, but ships reward attention more than most. Start with a small 1/700 destroyer and see where it goes.