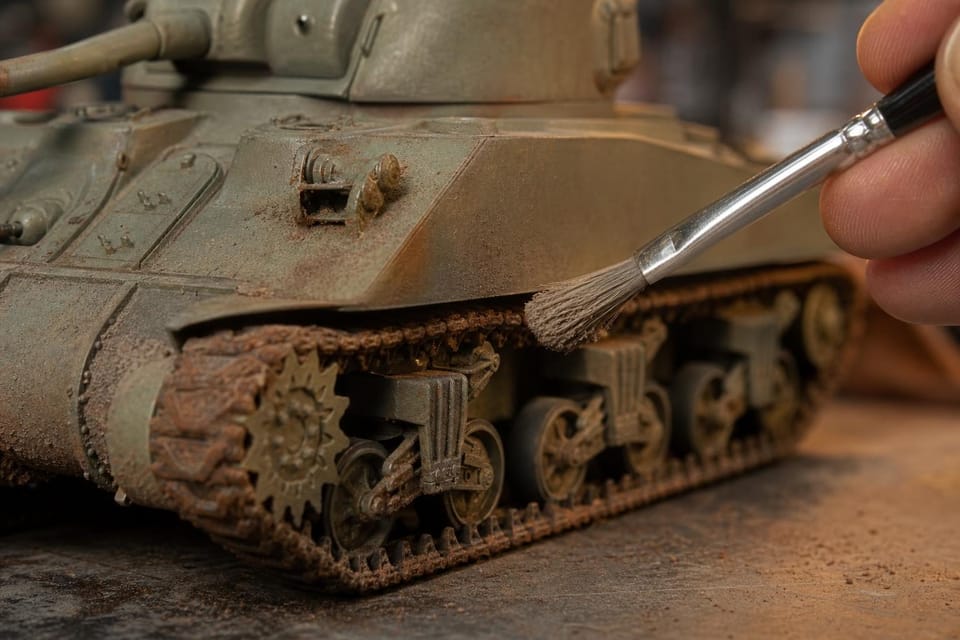
A freshly painted Panther has crisp edges, a flat even finish and no sign it has ever left the factory. It looks like a toy. A few hours with a pot of thinned brown, a sponge and some dry pigment, all of it applied over a base laid down by brush or airbrush, and the same model looks like it has driven through a winter.
Weathering is a set of separate techniques, and the order they go on in matters more than any single product.
Seal the paint first
Washes flow best on a smooth, slightly glossy surface, so give the model a gloss or satin varnish before starting. It also protects the paint and the decals. Weathering done on bare matt paint soaks in and stains.
Washes: pin and overall
A wash is paint thinned to the consistency of tinted water, brushed on so it settles into recesses and leaves the raised detail pale.
Pin washes are the precise version. Touch a fine brush loaded with dark wash into panel lines, around bolt heads and beside raised edges, and let capillary action pull it along the line. Wipe stray marks with a brush dampened in thinner.
Overall washes cover a whole panel or the whole model and pool in the low areas, shading the model as a whole.
Enamel washes go over acrylic paint with little risk, provided the acrylic is fully cured and sealed. Ready-made washes come from AK Interactive, Mig and others, and you can mix your own from enamel paint and white spirit. A little goes a long way. Reverse the order (acrylic over enamel) and you invite lifting.
Filters and dot filters
A filter is a thin, translucent coat of colour that changes the tone of the base without hiding it. A touch of brown over a sand-yellow tank, or a wash of pale blue over a grey ship’s hull, makes the surface look sunbleached or aged.
The dot filter is a slightly different technique with oil paints. Place small dots of oil colour across a panel, then drag a brush dampened in thinner through them, blending the dots into a soft mottled finish. Use different colours on neighbouring areas for subtle variation.
Oil paints for streaks and stains
Artists’ oils, thinned with white spirit, stay workable for hours, which suits blending. Use them for rain streaks running down a hull, grease stains around an engine and soot near exhausts. Draw the colour in a thin vertical line and drag it down with a clean brush dampened in thinner. Always work in the direction gravity would pull the dirt.
Pigments: dust, mud and rust
Pigments are dry powdered colour. They give the finest dust effect, and they suit tracks, lower hulls, wheel arches and exhausts. Apply them to a matt surface with a soft brush and fix them either with a pigment fixer or thinner. Left unfixed, pigment rubs away with handling.
Match the pigment to the setting. Light earth tones read as desert dust, darker earth as European mud, and orange-brown as rust. Brush from the bottom upwards to build up dirt where a wheel would throw it.
The order that works
Weathering layers fight each other when done in the wrong sequence. The reliable order runs from wet and glossy to dry and matt:
- Gloss or satin coat, then decals.
- Pin washes and overall washes.
- Filters and oil streaking.
- Matt varnish to seal the lot.
- Pigments, last, because they need a matt surface and would be wiped off by any later wet work.
Chipping goes in earlier, between the base colour and the top coat, and the model is sealed afterwards.
Tracks, running gear and the lower hull
The lowest parts of a vehicle collect the most dirt, so this is where the heaviest weathering belongs. Paint tracks a dark rust-brown, wash them, then rub graphite from a soft pencil along the raised faces of the links where they contact the ground for a worn-metal sheen. Dust the lower hull and road wheels with pigment, thinning towards the top deck so the model fades from dirty at the bottom to clean at the top.
For ships, the equivalent is the waterline and the areas below the deck edge, where rust runs and salt marks gather. Aircraft weather around engine exhausts, fuel fillers and walkways.
Chipping: sponge and hairspray
Paint chips where an object takes knocks. Two methods dominate.
The sponge method is quick. Tear a piece of foam from a blister pack, dab it in a dark brown or rust colour, blot most of it off and tap it lightly onto edges, hatches and the areas where a crew would step.
The hairspray technique gives more convincing results. Paint the model in the chipped base colour (for example, a dull rust red). Spray hairspray over the top and let it dry, then paint the top colour over it. Once the top coat is dry, wet it with water and scrub it gently with a stiff brush. The paint lifts in irregular patches, revealing the base colour beneath. Practice on a spare part first, as water and pressure both vary the result.
Restraint by scale
The smaller the model, the less weathering it takes. A mud splash that looks right on a 1/35 tank looks like a landslide on a 1/72 one, and a streak that reads well on a 1/350 ship disappears at that size if it is too fine. Scale effect, the idea that colours appear lighter and details larger on small models, means pale washes and modest chipping beat anything dramatic.
Look at photographs of the real vehicle, ship or aircraft before reaching for a brush. Real tanks are often cleaner than modellers think, and wear concentrates where hands, boots and tools touch. A single well-placed oil streak under a hatch does more for the model than ten scattered ones, and a clean flat upper surface makes the dirt below it look believable.
Next step
Practise each technique once on a spare hull or the underside of a model before using it on the display side. For a first project, the armour guide shows how washes, chipping and pigment combine on a tracked vehicle, and the aircraft guide covers exhaust stains and panel-line shading.